Category Archives: Online Business Manager

When a VA Needs a VA

So, here’s a conundrum: when should you hire someone to do your job? At first glance, that may seem ridiculous, right? Why would you hire someone when you can do it?

But, in some cases, that’s exactly what you should do! Hiring yourself a virtual assistant can actually be the best business move.

You can probably rattle off several benefits to using a virtual assistant. You know, the list you use when you’re trying to land a client. But have you ever stopped to realize those benefits of using a virtual assistant apply to you too?

There are two great situations when a virtual assistant should hire a virtual assistant.

Situation One: When you want to keep a client, but can’t meet all their needs

So, you just found a great client. Congrats! But, something about the gig is beyond your ability. You don’t have to sigh sadly and say goodbye. You can use a virtual assistant to fill in the gaps.

Maybe you lack the right equipment for a project. A small portion of the work involves using Quickbooks. The occasional editing project requires Photoshop. It won’t be enough hours for you to justify buying whatever software, but it still needs to be done. Hire a virtual assistant with the right equipment to handle those tasks for you. It’s a win-win. The client gets every need taken care of. You don’t have to dump money on something you’ll hardly use. You pay it forward supporting your fellow virtual assistant in giving them a small gig (hello karma!).

Maybe you lack the expertise for a task. The client needs you to write blogs (your forte!) but also needs help coding a site (your worst nightmare!). Part of the gig requires creating social media posts, which you know nothing about. The client wants you to occasionally call their customers, and speaking on the phone terrifies you. Pass off the task to a better suited virtual assistant. Again, it’s a win-win! The task gets handled by someone more qualified, making the client happy. You can avoid tasks you’re uncomfortable with. And you support your fellow virtual assistant (more karma!)

Maybe you just lack the time. It’s a busy season right now, and you can’t keep up. You don’t have to drop a client, and you certainly don’t have to run yourself ragged or drown trying to keep up. You can hire a virtual assistant to take on some of the load. A virtual assistant can be hired for a short-term project or two, or become a permanent member of your team. Whatever better fits your need, you’ll benefit from the helping hand.

Situation Two: When you want help managing or growing your business

Maybe your need is internal. You need help maintaining the status quo, or you’re ready to take things to the next level. A virtual assistant can be a great help with business building tasks.

You can pass off little tasks that need to be done, but don’t need to be done by you. Things like data entry, scheduling, or addressing envelopes are great tasks to delegate. Do a time audit for a week to see the biggest time sucks. You may be surprised at how much time you spend with these little tasks that can be handled by someone else. Pass off anything that someone else can do 80% as well or better. For help finding specific tasks to delegate, use our delegator worksheet.

You can also pass off tasks that need to be done, but shouldn’t be done by you. Tasks that you lack the knowledge or experience for, like social media or SEO marketing, are well-suited for a specialized virtual assistant. Hiring a team member can help make sure these important business building tasks get done, and get done well.

You can also bring in a virtual assistant just for a fresh perspective. Maybe you’re working on an idea project and you need brainstorming help. Maybe you’re stuck and need an outside view. Maybe you’re hoping to change your approach, and could use fresh eyes to shake things up. Whatever the reason, a virtual assistant can offer a new perspective.

Before You Outsource to a Virtual Assistant

If you’re ready to hire a virtual assistant, make sure to do these three things first. It’ll make the hiring process a better experience for you both (why couldn’t everyone be a dream client like you?)

  1. Be ruthless about a task’s necessity. Stop and really evaluate whether the task even needs to be done. You’d be surprised how many things we do on autopilot, things that we should eliminate. As Timothy Ferris, author of The 4 Hour Workweek says, “never automate something that can be eliminated, and never delegate something that can be automated or streamlined.” You shouldn’t waste time outsourcing tasks that aren’t imperative. Make sure it’s necessary and cannot be automated before you delegate it.
  2. Make the process efficient. Look at the steps used for the task. Can you remove any unnecessary steps? Can you make any steps more efficient? Can you batch tasks for better productivity? When you make the process more efficient, it takes less time and costs you less money.
  3. Put all the needed information in one place. Give your virtual assistant a guidebook with everything they’ll need. Include passwords, step-by-step instructions, and an example if possible. Cut down on the amount of time you’ll need to explain the project. Make things as clear as possible for the virtual assistant to reduce the time spent asking questions. Plus, if the project is ever repeated, you’ll have a guide ready to go.

If you’re ready to hire a virtual assistant, consider Alpine Small Business Solutions! Our expert staff can help you with any project, so give us a call or shoot us an email today.

How to Delete Facebook Apps

Today’s tutorial request comes in from Daniel.  Daniel was curious how to remove apps from his Facebook settings. He was worried that they were obtaining too much personal information.


“Wrapping Up the Year” Checklist for Small Business

A quick glance at the calendar can send a shock of stress to the small business owner…how can it be the end of the year already? With so much screaming for your attention, it can feel overwhelming. Don’t worry, with a little organization you CAN get it all done. Follow our checklist to ensure everything is wrapped up nicely by the end of the year.

Team Member Management

  • Conduct end of the year team member reviews. Provide constructive feedback to your time-for-reviewteam members. Praise their successes. Encourage reflection on their struggles and setbacks. Ask if they are happy with the direction of their role, and if there’s anything you can help them with. Talk with them about their life apart from work. Do everything you can to support them and ensure they feel valued, both as your valued team member and as an individual.
  • Team member appreciation. Even a small gesture can make a big impact. Show your awesome team member(s) how much you value them. Give a holiday bonus, a thoughtful gift, a memorable holiday party.

Client Relations

  • Write a thank-you note to all your clients. A handwritten card or letter helps your business stand out in a world of mass emails. Express how much you value your clients, and how you look forward to working with them next year.
  • Assess every client’s worth to your organization. Evaluate whether it’s beneficial financial-recordsfor your business to move forward with every client relationship. Weigh a difficult client’s benefits against the time, emotional exhaustion, and stress required to deal with him or her. Sometimes it’s not worth the income. When the costs are too high, it’s better for you and the client to part ways.
  • Review financial records. Meet with your accountant to ensure your books are complete and up to date. Preliminary work now can save a huge amount of time come tax season (or in the event you get audited).
  • Conduct a profit and loss report. Put in writing the financial state of your business. It’ll be a good analysis of this year’s progress and serve as a benchmark when you make financial goals for next year.
  • Collect outstanding bills. Go through accounts and see which clients still owe money. If possible, get the payment before the year ends.
  • Review payroll. Make sure all accounts are covered and there are no outstanding payments. It’s easy to forget about bills such as transportation reimbursement, so double check to be sure everything’s taken care of.

Business Management

  • Backup all data. Save all your documents and contact information in the cloud or on an external hard drive. It’s tedious, but incredibly important.
  • Write an end of the year memo. This memo for your wonderful team members is two-fold. First, memocelebrate the past year. Highlight accomplishments and successes of the organization as a whole, and spotlight individuals who went above and beyond. Mention notable changes, like welcoming new staff members or new clients. It’ll be a good refresher for you and your team. Second, build up enthusiasm for the year to come. Talk about goals and the vision for the upcoming year to provide a concrete direction for the business.
  • Prioritize projects. Determine which projects need to be finished before the year’s ends. Tie up the loose ends for projects nearly completed, projects where it would be difficult to pause for the holidays, or projects for impatient clients. Set aside projects that can be easily started again after the holidays, or ones that benefit from a fresh perspective after the new year.

Self-Care

  • Really relax and rest. Entrepreneurs can be the worst at self-care! But burning yourself out is terrible for your health (and productivity!) Be sure to set aside time during the scramble to take care of yourself with massages, a night of Netflix, whatever you need to fully unwind and recharge.
  • Enjoy the holidays unplugged from work. By this point, you’ve done everything you need to do. Now enjoy your holidays!

If you need assistance accomplishing your end of the year administrative tasks, Alpine Small Business Solutions is here for you! We can handle short-term (or long-term) projects, freeing up your time to focus on other projects. Give us a call or shoot us an email today.

13 + Free Stock Image Websites for Startups and those on a Budget!

There are many costs and concerns to consider when starting a new business, but one that you may not think of is quality images. When building your website, writing a blog, or doing social posts for your business, you will want to add photos to jazz up the look. Imagery is a great way to add imagination and creativity to your website, blog, and social media, but, you need to make sure you are not using copyrighted material. Finding high-quality images  can take some time, but it is worth the time to present your business in a good light. (You can also hire a virtual assistant to take the time to find good images and present you with a few to choose from.)

As important as quality stock photos are for any business, you don’t have to spend an arm and a leg to get them. There are many sites that offer quality imagery that does not cost a thing. They may not always be exactly what you imagined, but you can often find something that will cover your needs at no-cost for your business.

Listed here are several sites that offer images with no charge and no issues with copy right. You can use these images for whatever you would like. Your online business manager may have others you can use as well.

Pixabay-logo.svg

Pixabay is a great tool for all your stock image needs. All images and videos on Pixabay are released free of copyrights under Creative Commons CC0. You may download, modify, distribute, and use them royalty-free for anything you like, even in commercial applications.

Stock Photos | Alpine Small Business Solutions

Morgue File contains free high-resolution digital stock photographs and reference images for corporate or public use. This site allows you to search for specific photos and has a very large archive. Be aware, there are links to other photos that you would have to pay for.

Stock Photos| Alpine Small Business Solutions

Unsplash is a great resource for high-resolutions photos. You must  subscribe to the site, but after you sign up, you get 10 new photos every 10 days.

gratisography

Gratisogroahy is a free high-resolution pictures you can use on your personal and commercial projects.

Stock photos | Alpine Small Business Solutions

Picjumbo is an easy-to-use site full of different categories of photos that are completely free for personal or commercial use.

Startup Stock Photos is an easy site that you can use all the photos from however you choose. It has an archive that you can browse through. The photos are high-quality but the site is relatively new so the archive is somewhat small still.

Freeimages

FreeImages is a free membership to resources for designers’ backgrounds, images, and photo collections.

Stock Photos | Alpine Small Business Solutions

Little Visuals is a subscription site. You get seven high-resolution images sent in a zipped file to you every seven days.

Stock Photos | Alpine Small Business Solutions

Life of Pix another site that allows you to use the photos however you choose with no copyright restrictions. They have a fairly large gallery that you can browse through different categories of photos.

kaboompics

Kabookpics is a Great place to get breathtaking Free Pictures for business or personal projects.

Stock Photos | Alpine Small Business Solutions

Death to the Stock Photo site is large and full of many different categories of photos. They send photos to you every month, but it does have an option to buy a subscription for premium options.

mmt

MMT Stock images are a free for commercial use photos by Jeffrey Betts.

sw-brandstack_dark_265x265

Snapwire connects mobile photographers with businesses and brands that need creative imagery. Authentic, Royalty-Free photos created just for you


Stock Photos | Alpine Small Business Solutions

SplitShire site is run by a photographer who was sick of trying to find quality images that didn’t cost a fortune. It has a premium option that sends all the photos right to your Drop Box, but the site is large and full of categorized photos all for free.

Stock Photos | Alpine Small Business Solutions

New Old Stock has many photos that are popular or fairly well known. This site works under “no known copyright restrictions.” This basically means that the copy rights have expired or aren’t likely to be enforced, but they take no liability for their use.

Stock photos | Alpine Small Business Solutions

RGBstock site requires registration, but is very large and full of photos that are categorized and have a search option available. The only restriction they have on the photos is that you can’t use them for anything in a resale form. In other words, you can’t print and sell their photos.

freepik1

Freepik offers users, high quality graphic designs: exclusive illustrations and graphic resources carefully selected by our design team in order to provide our users with great content that can be used in both personal and commercial projects.

Bonus site… because we all like surprises

all the free

AllTheFreeStock is the one place to find all the FREE Stock Images Stock VideosSound EffectsIcons & more.. Get all the Free Stock Images, Videos, Music and Icons in one location. All of the sites under [ Free Stock Photos ] offers images listed under the Creative Commons Zero license, so you are free to use these images in commercial projects. [ Free Stock Videos ], [ Free Sound Effects ] & [ Free Icons ] offer different licenses.

I am sure there are many more great sites out there that have quality images free of charge that can be used in your small business, however, your creative heart desires. Share your favorites with us in the comments below.

5 Reasons Why You Should be on the Google+ Social media Platform to Grow Your Online Business

Yes, I know…it is the next big thing…AGAIN! We have heard it several times that Google+ is going to be huge, yet you don’t use it or really even know what it is. So why do you want to be on it now?

Usually, you want to use social media outlets your target audience is active on. Not always. Insert Google+, the failed social media platform created by Google to compete with Facebook and Twitter. It comes and it goes without you ever really noticing. So why would I push you to be active on a failed platform? Sure, Google+ lacks the prevalence into popular culture that Facebook and Twitter can rightly brag about. But it offers unique benefits to marketers for growing your business, enough to justify the minimal time it takes to grow a thriving Google+ presence.

But first, what really is Google+?

g-1460601__180While Google+ is a unique social media platform, it can be helpful to think of it in terms of other more familiar platforms. It offers an easy way to curate and organization information (like Pinterest), the option to follow anyone without needing them to follow you back (like Twitter), and the ability to create a personal profile and a business page (like Facebook). Unlike other social media platforms that are relationship driven (connect with people you know), Google+ is more interest driven (connect with people who share similar ideas/interests). What really sets Google+ apart, though, is that it’s created by Google. And Google rewards users who consume their social media platform, resulting in the biggest benefit of Google+ being its SEO benefits.

Google+ SEO benefits

Google+ improves your SEO through a few ways. First, posts that are high in shares and +1 (the Google+ version of “likes” and “favorites”) rank higher in search results. So when you publish content high in shares and +1, that content is seen more by individuals and increases the chances they check out your website, become a customer, etc.

google-plus-1007069__180Second, through the use of Google+ Circles (similar to friending someone or liking a page on Facebook). If an individual is logged into Google and they added you to their Google+ Circle, your content is more likely to show up in their search results.

Third, your Google+ posts are immediately indexed into search results, translating into SEO benefits quicker than if you were to post the same content on another platform.

When your content shows up higher in search results, more people can discover your content. More eyes on your content means more visits to your website, more conversions into customers, etc. SEO is a crucial aspect of business building, and Google+ is a great way to strengthen your SEO.

While SEO is the biggest benefit to Google+, it is definitely not the only benefit.

Audience Segmentation

Google+ offers a feature called “Google+ Circles” which allows you to organize contacts into specialized groups. Each time you publish content, you get the option to only share with relevant group(s). This allows you to provide solid content specialized for individual users, providing them high benefit without oversaturating their feeds.

Target Audience Finding

google-plus-1183714__180Another great Google+ feature is “communities.” These are similar to Facebook groups. They are created by individuals and members within communities share and engage with content. Communities are categorized into different topics, such as football or photography. Posts are organized into sub-topics (for example, in a freelance writers’ group there are topics of marketing, writing tips, and writing tools) to help users sort through the high quantity of information.

Say you are a healthy food blogger. You can join communities such as healthy recipes or vegetarian eating. Individuals in these groups are targeted audiences who may want to consume your content and use your services. You can post regularly quality content (such as recipes) in hopes of directing members of the community to your blog. It’s applying the content marketing strategy (provide quality free content to be seen as an expert in your industry and increase the likelihood consumers will use your business when they need to buy a product/service) to a highly targeted audience. As a result, your content marketing efforts are more efficient.

Improving Your Knowledge

Communities aren’t just for you to share information-you can use them to gain knowledge too! First, you can improve the relevance and quality your content. See what types of content other similar businesses post to gain new ideas for blog posts. Find out what topics individuals respond to, and tailor your content to fit that. Second, you can join communities related to content marketing, social media, and the like to stay up-to-date with the latest marketing trends and tools.

Using Google+

Google+ offers many rich benefits to marketers who take advantage of it. If you’re really strapped for time, you can connect your Google+ account to Hootsuite and share every Facebook post to Google+ as well. If you’ve got more time, however, the recommended strategy is to treat Google+ as its own social media platform. The style of posts that resonate most with your audience on Google+ will be different than the posts that resonate with your audience on Facebook, Twitter, etc. You can take content you’ve already made (such as blog posts or newsletter copy) and share on Google+.

Ready to take advantage of Google+ but aren’t sure where to start? Alpine Small Business Solutions is here for you! We’d love to help you with Google+, or any aspect of small business building. Simply give us a call or shoot us an email today!

Warning: Facebook will be Deleting Photos from Your Facebook Account and you may not even know it!

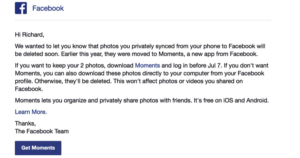
As of July 7th, 2016, Facebook will be deleting many of the photos you took using a smartphone unless you swap to its new Moments picture sharing service and anyone who used Facebook’s ‘syncing’ feature is at risk.


woman-638384__180The function stored all the pictures taken on a smartphone in a special private folder, so users could decide whether to share them publicly at a later date or just store them for their own personal keeping.

The only way to keep them is to download the new Moments app, which collects pictures based on when they were taken and who is in them. The social network began notifying users that it would soon delete all their synced photos if they did not install the app, which was released in June 2015.

The process actually started in January when Facebook discontinued support for automatic syncing of photos from the main Facebook app, forcing users to install the Moments app should they wish to continue automatically uploading their photos.

hands-1167617__180Rest assured though, the removal of the synced photos won’t affect any photos or videos shared on Facebook separately from the synced album, while users are being given the chance to download the photos before they are deleted to those that are synced. Actually, Facebook recently did a very similar thing with its Messenger app by removing chat from the main Facebook app and forcing users to install the Messenger app to keep sending Facebook instant messages.
These changes help Facebook by giving them other platforms to endorse and promote which in turn builds their name along with new apps that are now showing a rise in users such as the Messenger app and soon the new Moments app. Nonetheless, if you love your selfies, you should probably make sure they are saved permanently on your computer especially if you don’t fancy using Moment.

Anyone who’s used Facebook’s auto sync feature in the past has until July 7th to download Moments or a zip file of their synced photos. Otherwise, they’re going to disappear.

Not sure if you have any synced photos to be worried about, Facebook actually sent out an email to all its’ users telling them they are getting ready to retire the “synced photos” feature and in order to save them you must download and use the new Moments app.

fb sync 1

“Synced photos” is a feature that you had to take the time to turn on and it would sync the photos on your phone with Facebook in a private album. If you never turned it on, you have nothing to worry about. Facebook will not be deleting any photos you’ve shared with friends in albums or uploaded to your timeline. If you deleted the message from Facebook or never remember getting one it can be tough to know just how many photos will be deleted. However, there is a pretty easy way to see how many of your “synced” photos are at risk of being deleted.

First, make sure you’re logged into your Facebook account, then go to: https://www.facebook.com/photos. Now, look above your photos for a link that says “Synced from Phone” and click that. If you don’t see a link for “Synced from Phone” then you never used the feature and you don’t have to worry about this.

fb sync 2

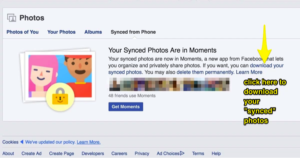
Look for the link that says “delete them permanently” and click that. (Don’t worry, it won’t delete them instantly)

fb sync 3

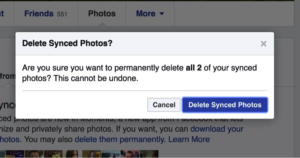
Then you should see a popup window with a count of the photos that have been “synced” to your account.

fb sync 5

Facebook should then show you the actual photos you have synced so you can make an informed decision as to whether you need to download Moments to save them but they don’t.

Therefore, from here you have two decisions to make – you can follow the other link to “download your synced photos” and toss them into your other backup service like Google Photos/iCloud or you can download the Moments app to actually see the pictures in question.

fb sync 6

If it’s a low number I suggest just using the download link but if it’s a larger amount of pictures and you want to see which ones are at risk of deletion you probably want to download the Moments app.

While users will be able to save their photos if they wish, the forceful methods used by the social media network has drawn criticism from users, with claims that Facebook is using its enormous leverage to force users to install its apps.

10 Hidden Gems in Facebook Personal Pages

Facebook is a fantastic invention-you already love it, but there’s a lot hidden beneath the surface. We’ve dug deep into Facebook to find the top 10 hidden secrets.

  1. Message Requests

Not every message that’s sent to you on Facebook shows up in your inbox. Messages sent by someone you are not friends with on Facebook go into a “message request” section.

To access these, click the chatat the top right of your screen. Then click “message requests” (to the right of “recent”).

  1. Save Button for Posts

Sometimes we find great content on Facebook . . . right when we have the least amount of time to actually read it. Never fear-the save button is here! The save button allows you to privately save links to read later.

If the post you want to save popped up on your news feed, simply click the to the right of the post and click “save”.

fb block

If you’re viewing the post from a page, click … and click “save.”

To view your saved posts, go to the left menu and click “saved” (or you can go to Facebook.com/saved).

fb block 2

When you want to delete a post, go to the “saved” posts section. Click “archive” at the top and click next to the post you want to remove, then click “delete.”

  1. Download Copy of FB Data

It’s no surprise that Facebook stores a lot of data on its consumers—A LOT. While you can’t stop Facebook from storing this data, you can access it (or at least some of it). Facebook allows users to download their information, which includes information you can see by using your account (such as posts you share and your activity log) and information you cannot see from your account (such as ads you’ve clicked on and IP addresses that are logged when you use Facebook).

Facebook provides a long list of what types of data is available in the downloaded information (which you can access here: https://www.facebook.com/help/405183566203254) but there are a few key subjects that may be of the most interest to people: searches you’ve made on Facebook, removed friends, pending friend requests, any friends apps or pages you’ve hidden from your news feed, list of people who follow you, and a list of topics that you may be targeted against based on your status likes interests and other timeline data.

To download the information, go into your settings section. Click “download a copy of your Facebook data” below your general account settings. Click “start my archive.” Depending on how long you have been on Facebook and how much you post, it may take a while, but they will email you when it is ready for you to view.

  1. Adding a Legacy Contact

While it’s uncomfortable to think about, it’s important to decide what you want to happen to your Facebook account when you pass away. Facebook provides two options: delete your account permanently or leave up the account and allow loved ones to share memories on it. For the later, you’ll need to designate a legacy contact. They’ll be able to write a pinned post (which can be used to provide memorial service information or share a message on your behalf), accept new friend requests from loved ones, and update the profile picture and cover photo. They will not be able to remove any friends, read your messages, change or remove past posts, or actually log into your account.

To add a legacy contact, log into your settings and click “security” and then “legacy contact.” Type in your designated contact’s name and click “add.” If you later decide you want to change the contact, you’ll be able to click on the contact and click “remove.” Then you can add your new legacy contact.

It’s difficult, but important, to think about what will happen when you pass on. If you run a business, be sure to check out our post on how to prepare your business for an unexpected life crisis: link to post here.

  1. Edit Ad Preferences

Ads can be annoying. Ads that relate absolutely nothing to your life or preferences are even more annoying. Fortunately, Facebook allows you to edit your ad preferences. Simply click (www.facebook.com/ads/preferences/edit/). The link will bring you to a page listing topics and sub-topics that Facebook picked based on your activities on and off Facebook. You’ll be able to delete irrelevant preferences, as well as add preferences from a set list of topics.

  1. Send and Receive Money Through Facebook

Yes, you read that right. You can now send money to people through Facebook Messenger without a charge! First, you need to add a debit card. Click “settings,” then click “payments,” then click “add new debit card.” Currently, the only way to pay through Messenger is debit. You can also add a PIN if you wish for an extra security measure (click “settings” then click “payments” then click “PIN”).

Once your debit account is activated in Messenger, you’re ready to send money. Create a message and click the $ icon and enter the payment amount. Click “pay” in the top right to send it.

fb block 3

To receive money for the first time, open the conversation and click “add card” in the message to add your debit card.

Just like with other transfers, it may take up to three business days for the banks to make the funds available.

  1. Embedding Posts

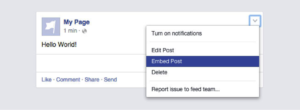
Did you know you can embed public Facebook posts onto your website? It’s simple and a great way to add visual content to your site. First, navigate to the post and click “embed post” from the drop down menu.

fb block 4

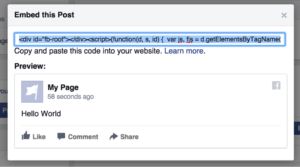
A box will pop up with a code, which you will need to copy and paste into your website.

fb block 5

Embedded posts are a great way to post testimonials, include examples, quote sources, show off your best content, and more!

  1. Friendship Pages

This feature was developed during a Facebook Hackathon. It is basically a timeline, but for a relationship instead of one person. It gathers all the communication (posts, replies, tagged photos, etc.) that involve you and a friend you choose, and places it all in the Friendship Page. You can view these posts, and even personalize the cover photo and profile picture.

To access the page, go to your friend’s profile and click and select “see friendship” from the dropdown.

  1. Play Chess With a Friend Through Messenger

Who doesn’t love a competition of intelligence and strategy between friends? Simply type “@fbchess play” into a conversation with a friend and Messenger will bring up a game of chess. To move type in the phrase “@fbchess” followed by the letter of the piece (K for king, Q for queen, B for bishop, N for knight, R for rook, and P for Pawn) and the letter and number of the location‑For example, “@fbchessPe4” would move a pawn to square E4. If you get confused, type in “@fbchess help.” If you wish to end a match, type in “@fbchess resign.” To pick which color to start with, type “@fbchess play white” or “@fbchess play black” (white goes first).

  1. Play Basketball With a Friend Through Messenger

Maybe chess isn’t your thing. How about a friendly basketball competition? Simply send a friend a basketball emoji and then click on the sent image to begin the game. The scores will be logged in the message feed so you can brag (or listen to bragging) easily.

To play the game, flick up on your phone to launch the ball into the hoop and try to get as many in as possible.

Facebook for personal use offers hours of endless entertainment, from dominating at a basketball game to reminiscing over old memories when viewing the Friendship Page. Facebook is a great tool for businesses as well. If you’d like help utilizing the benefits of Facebook for your business, simply call us or email us today! We are here to help with any aspect of business building, including social media marketing through Facebook.

Facebook Removes the 20% Text Rule

To the joy of marketers everywhere, Facebook finally altered the 20% text rule! This recent change will provide more flexibility and freedom to marketers, while likely impacting the ad experience for Facebook users. Below we break down some common questions about this recent change.

What was the rule before the change?

20%Previously, Facebook rejected ad requests where more than 20% of the image contained text. This caused frustration among marketers whose ads were rejected for containing just barely too much text, and for brands whose logo was text. Some arguably creative and effective ads were also rejected due to containing too much text.

Why did this rule exist if it caused so much frustration?

Facebook, as it repeatedly claims, is all about the user experience. Part of the user experience is the appearance and feel of the timeline. The line of thinking from Facebook went something like this… if ads appeared on timelines containing massive amounts of text, the timelines would appear cluttered and users would be less satisfied with the look of their timelines. Preventing advertisers from using too much text also helped push advertisers to make more creative ads that focused on “showing” rather than “telling,” since you rely on words to “tell.”

So with this change, can I now use as much text as I want on ads?


carrots-673201__180Marketers are now given the option to use photos in their ads that contain more than 20% text. No longer will beautiful ads be rejected for containing just a little bit too much text-marketers rejoice! The new change means Facebook will not stop advertisers from using an image simply because of an abundance of text (other restrictions, such as inappropriate images, still apply). However, Facebook still is pursuing the user experience as the priority. While it removed the “stick” form of motivation (punishing users for ads with too much text by preventing those ads from being published), it simultaneously implemented a “carrot” approach of motivation (providing an incentive to still use ads with minimal text). So even though it may not be a requirement, they still are going to make sure marketers keep limiting text at the top of their minds.

So, why would I still want to use ads with minimal text?

First, ads with too much text are not visually appealing. They make the photo appear cluttered and busy, two things you want to avoid because viewers will likely skip over it. Of course, there are exceptions where the cluttered and busy look is used to make a creative point, but generally speaking it’s a good idea to limit text from a graphic design standpoint.

thumbs upSecond, using too much text will negatively affect the amount of people who see your ad. Facebook has said that, given the same budget, ads with more text will reach a lower number of individuals than ads with less text. Hence the carrot again. They will motivate you to do what they like by giving you more views. Facebook won’t stop you from using too much text, but it makes it clear it is in the best interest of the marketer to continue using minimal text.
How will I know if my ad still uses too much text?

Images uploaded for ads will be placed into one of four categories. The one marketers should aim for is “image text: OK” because it will see no negative impact on reach. These photos contain no or minimal text. The next category “image text: low” sees a slightly limited ad reach. The third category “image text: medium” may see limited ad reach. The fourth category “image text: high” may not even reach the intended audience at all. When advertisers upload a photo in the grid tool, Facebook will let the user know which category the photo falls into.


6 Differences Between Facebook Ads Manager and Power Editor and How to Navigate them.

asbs blog pic

What? You didn’t even know you had options? Facebook offers two great tools to create ads: Facebook Ads Manager and Power Editor. Both can serve your marketing needs, but they both offer unique benefits and challenges, as most options you find out there will. Below are some of the key differences between the two tools. Facebook Ads Manager is the default tool, while Power Editor is a free download that is optimized for Chrome, using this tool in other browsers should be avoided.

Here’s what you should know:

Difference 1. Who are you talking to?

Your target audience is a big factor when you are working on making your ads. You want to make sure you are speaking to people who will make it worthwhile for paying for you your ad.

Facebook Ads Manager is the default tool, which means it’s more basic so it can be more user friendly. Anyone from the most experienced marketer to the average Joe freelancing on the side can use the tool to easily create, manage, and analyze ads. Power Editor is the more advanced tool, specifically created for larger businesses intending on creating and tracking many ads at once. Which tool you choose will be impacted by your advertising experience level and size of your marketing budget.

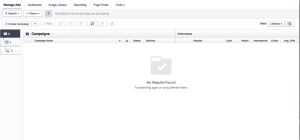
The layout of the pages reflects the target audience, with Facebook Ads Manager more simple (but with less options) than the Power Editor.

Figure 1 Facebook Ads Manager Screen

Figure 1 Facebook Ads Manager Screen


Figure 2 Power Editor

Figure 2 Power Editor


Difference 2. Isn’t always about the toys?

Many new advertising features are tested first on Power Editor, with the effective ones often eventually integrating into Facebook Ads Manager. For users who stick with the more basic advertising functions, this ability may be unnecessary. For users who work to keep up with the latest trends and wish to test out the latest techniques, this ability could be a desired advantage.

Difference 3. Location, Location, Location.

Both tools provide customization options for where you want your ad to appear. Ads manager offers more basic options among desktop news feed and mobile news feed. Power Editor allows specification about which types of mobile devices, more combinations of options on the news feed placement, and even an option to select only mobile devices already on Wi-Fi (which can be helpful if you’re concerned someone wouldn’t click your ad if they are not on Wi-Fi). According to a recent study on Facebook advertisements conducted by SocialCode, mobile ads earn up to 2.5 more than desktop only ads. (http://mashable.com/2012/06/19/facebook-mobile-ads-study/#JPUgK.SIlgqh)

Difference 4. What is your time worth?

The layout of Facebook Ads Manager is designed so users can create, edit, and analyze easily. There is less to clutter up the homepage, which means less time navigating to find the right tool or tab. For more basic advertising users, this can be a better option. Power Editor, on the other hand, allows users to upload bulk ads (including the option to upload from an Excel document) and edit multiple ads at once. For the more advanced advertising users, this benefit outweighs the busier homepage. Additionally, the Power Editor allows you to duplicate and edit past ads with ease, allowing time saved if you’re running similar campaigns time and time again.

Difference 5: MORE POWER!

Facebook ads manager limits your content, recommending only 25 characters for your headline and 90 characters in the body text to ensure the text isn’t truncated. This is specific to ads manager, because the greater amount of text, the greater the chances if it getting cut off once the ad runs. In Power Editor, though, you have the ability to design ads that have up to 110 characters for the mobile News Feed and up to 500 characters for the desktop News Feed. While your ads will likely never get that large, it removes the fear of getting your message curtailed.

Difference 6: Bullseye! Having the ability to target your audience directly is everything. Let’s put it this way; if you’re wanting to advertise your Yoga Studio, do you really want those paid advertisements to be lumped in with, say, mortgage lenders? The tools specific to targeted ads in Facebook Ads Manager are very limited, while Power Editor gives you the sky and the moon. Creating very specifically targeted ads in Power Editor is extremely advanced and not user friendly for the novice. Namaste, we’ll help you get this.

If you know you want to take advantage of the many benefits of Facebook advertising (or any other form of advertising) but don’t want to spend the time navigating either advertising tool, remember that Alpine Small Business Solutions is here for you! We can create and analyze Facebook ads for you to meet your organization’s advertising needs. And if there is any other aspect of social media management or business building that you want assistance with, we’d love to help. Just shoot us an email or call us up.


Facebook Billing Basics

asbs blog image

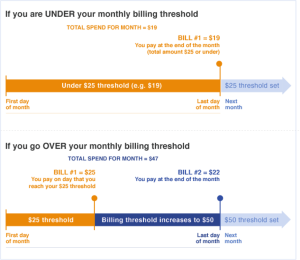
Facebook is always trying to streamline their processes and make things easier for them and you. If you have advertised with Facebook for a few years, you will remember the days of them billing your daily for their ads. Thank goodness those days are over. Facebook offers an ads payment plan where your account is billed once you spend a set amount. This plan, called a billing threshold, affects when and how often you are billed for ads. You still will be billed monthly if you do not hit your monthly billing threshold. See Facebook’s graphic below for a visual example.

blog1

Current billing thresholds options are at $25, $50, $250, $500, and $750. If you set a threshold, and later decide you want to lower it, you can change your settings in a few easy steps.

    1. Go to your Ads Manager and click on Billing. This should be at the top of your screen right under the ‘search’ bar

blog2


2. Under Billing Summary (far left underneath the Billing button), click Manage

blog3
3. A new window should pop up. Enter a lower billing threshold amount and then click Change Threshold.

blog4

If you manage multiple ad accounts make sure you are looking at the correct account, but the threshold is nice because you can set separate amounts for different accounts and play around with different thresholds to see what works best for you.
Also, don’t confuse your billing threshold with your budget. These are two different concepts, your budget will limit your total monthly charges, which can impact if, when, and how many times your account reaches your billing threshold.

And remember, if you don’t want to spend your time dealing with this side of your business (or any other aspect of social media for business), we got your back! Alpine Small Business Solutions is here to handle any and every part of your social media management and business building needs.
Thank you for taking the time to visit our blog, we hope you enjoyed it. As a friendly reminder, please share this blog on your social networks (and comment below, we love hearing from you!).

This blog is brought to you by Alpine Small Business Solutions, Your Virtual Assistant and Online Business Manager Solution.